How to Add a Website Form Integration to Lead Docket
Lead Docket is a powerful tool that allows law firms to manage leads and track marketing metrics. The customizability of Lead Docket means that the learning curve is steep. We will explore the Lead Docket integrations feature and learn how to implement a way to process form leads from your website in Lead Docket.

Why do you need your Website Form to Send to Lead Docket
When a potential client is interested in services, they may fill out a website form. Oftentimes, these website forms are sending their information to email. In this set up, this would require a human to be in the loop to update Lead Docket with the lead information from the email. Unmonitored inboxes could also mean a missed lead.
Instead, we should have this form directly send data to Lead Docket. This allows for intake people to monitor only one tool and take advantage of Lead Dockets other features from there.
Understanding Lead Docket Integrations
There are a few caveats to know about Lead Docket integrations. These are the most important to remembers when using integrations:
- Integrations with Lead Docket can create leads but cannot update them.
- Leads are posted in real-time as soon as Lead Docket receives the data.
- Lead Docket accepts data through an Endpoint URL, without requiring an API key or secret.
Setting Up a Web Form Integration
We will walk through step by step how to add a regular website form integration in Lead Docket. Depeneding on your website builder/hosting, getting information about your form will differ. Regardless, the steps will roughly stay the same.
Step 1. Add New Web Form Integration
- Navigate to Integrations
- In Lead Docket go to th
Integrationstab.
- In Lead Docket go to th
- Create New Integration
- Click “Add New” -> “Web Form”

- Click “Add New” -> “Web Form”
- Update the “Opportunity Name”:
- Ensure the “Opportunity Name” is descriptive, especially if you have multiple forms on the same website.
- Add an Email Address for Notifications:
- Add an email address to the “Email Addresses” field if you want to receive email notifications when the form is submitted.
Step 2. Field Mapping
Identify Form Fields:
- Locate where your website is hosted.
- Review the information you’re collecting in the form. In our example form instance we are collecting
first name,last name,phoneandemail. The example form we are going to work through is a standard, simplehtmlform. It is as follows:
<form>
  <label for="first_name">First name:</label>
  <input type="text" id="first_name" name="first_name"><br>
  <label for="last_name">Last name:</label>
  <input type="text" id="last_name" name="last_name"><br>
  <label for="phone_number">Phone Number:</label>
  <input type="text" id="phone_number" name="phone_number"><br>
  <label for="email">Email:</label>
  <input type="text" id="email" name="email"><br>
  <input type="submit" value="Submit">
</form>
Create New Fields:
- In lead
Form Fields, clickAdd New Field.
- Create a new field for every piece of information identified in the previous step.
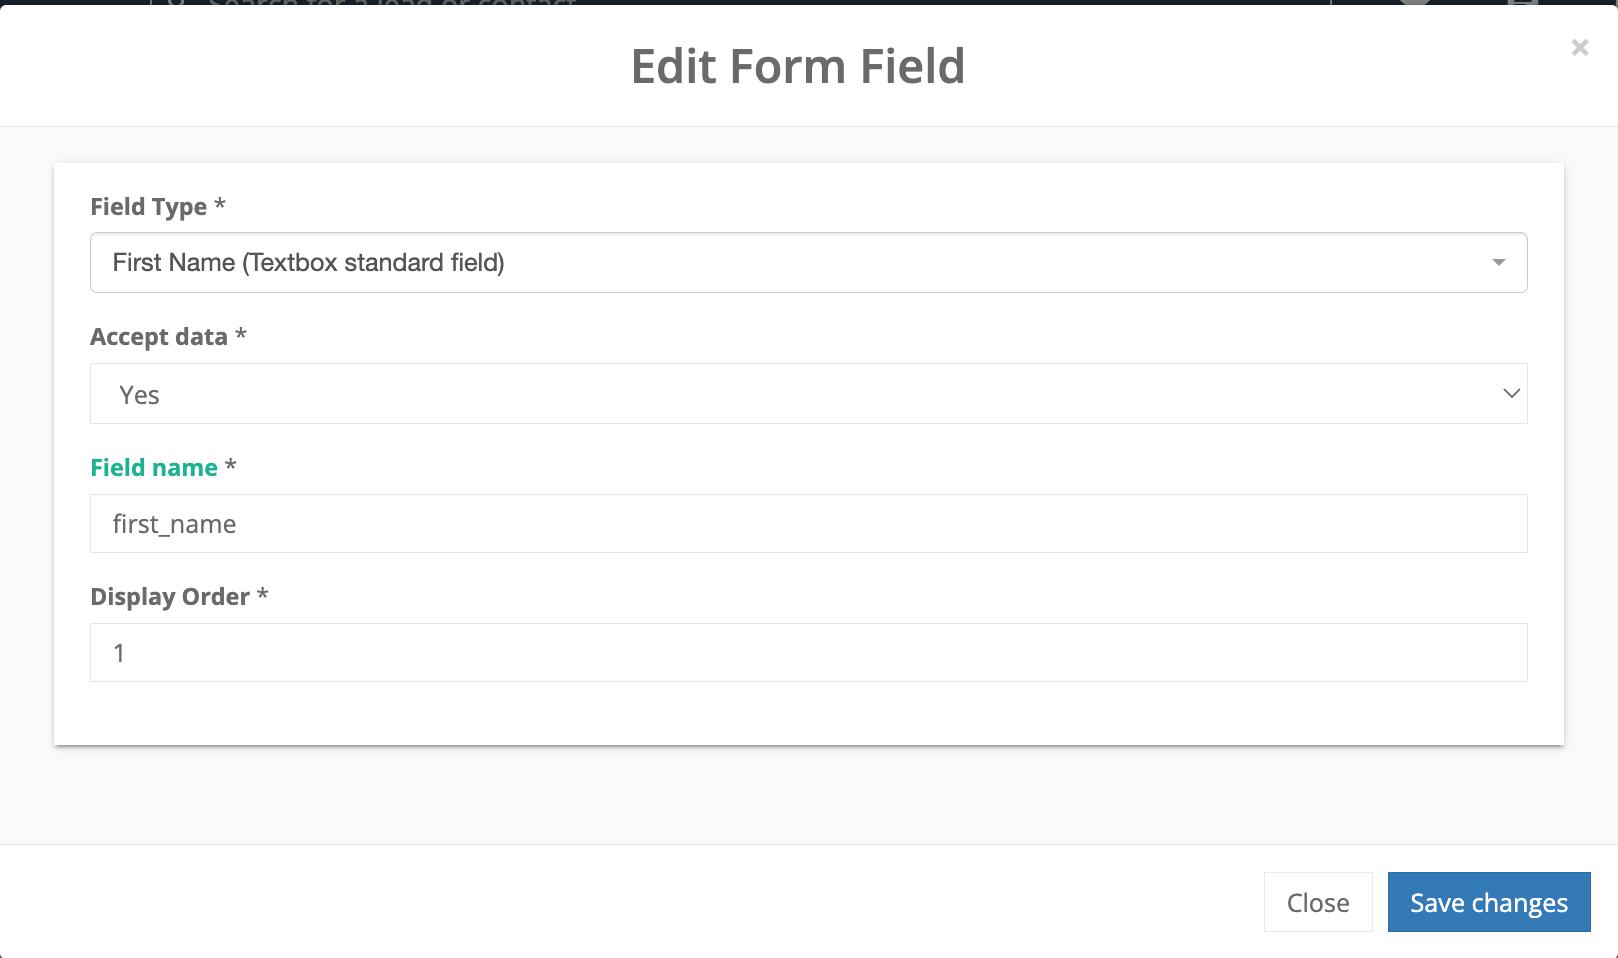
- When adding each new field, ensure that the
Field namecorresponds accurately to the field name in your form. For example, for the first name, theField namein Lead Docket would befirst_namein out form.
- In lead
Step 3. Update Your Form Endpoint
Locate the New Web Form:
- In your integrations list, find the new web form you created.
Access Definitions:
- Click
Definitionsfor the selected web form.
- Click
Copy the Endpoint URL:
- Under
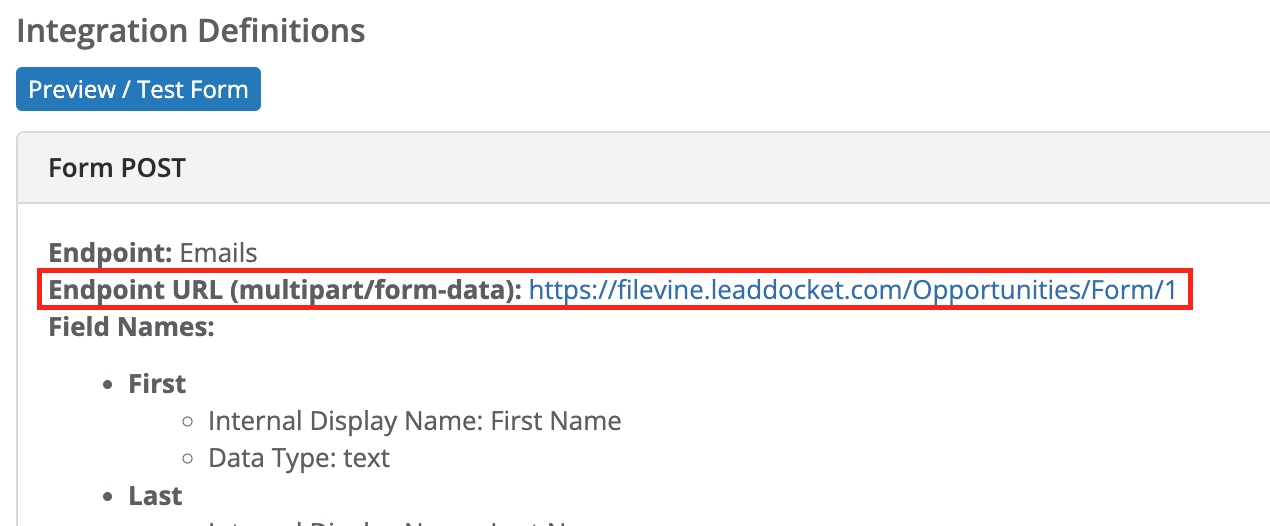
Form POST, locate the fieldEndpoint URL (multipart/form-data)and copy the provided link.
- Under
Update Your Website Form:
- In your website form, use the copied endpoint URL for form submissions. In our example, we add the endpoint url as the parameter to the
actionattribute in our form.<form action="https://filevine.leaddocket.com/Opportunities/Form/1"> <label for="first_name">First name:</label> <input type="text" id="first_name" name="first_name"><br> <label for="last_name">Last name:</label> <input type="text" id="last_name" name="last_name"><br> <label for="phone_number">Phone Number:</label> <input type="text" id="phone_number" name="phone_number"><br> <label for="email">Email:</label> <input type="text" id="email" name="email"><br> <input type="submit" value="Submit"> </form>
- In your website form, use the copied endpoint URL for form submissions. In our example, we add the endpoint url as the parameter to the
Finalizing the Integration
By following these steps, your website should now be able to post data directly from it’s form to your Lead Docket. It’s important to conduct a test to verify that data is sent and that the mappings are correct.
